🚀 STOP Using “Dirty” PNGs! How to Clean White Edges in Photoshop
You found the perfect asset. It’s exactly what your thumbnail needs. You drag it into Photoshop and… BAM. A nasty, thin white outline appears around the edges.
It looks cheap. It looks amateur. It looks like a “dirty” cutout.
Don’t delete the file! Whether you’re using our Blue Checkmark PNG or a custom YouTube Reaction Face, here is how to “clean” your assets in 3 fun levels.
🕹️ Level 1: The “Magic Eraser” (Defringe)
Difficulty: Super Easy
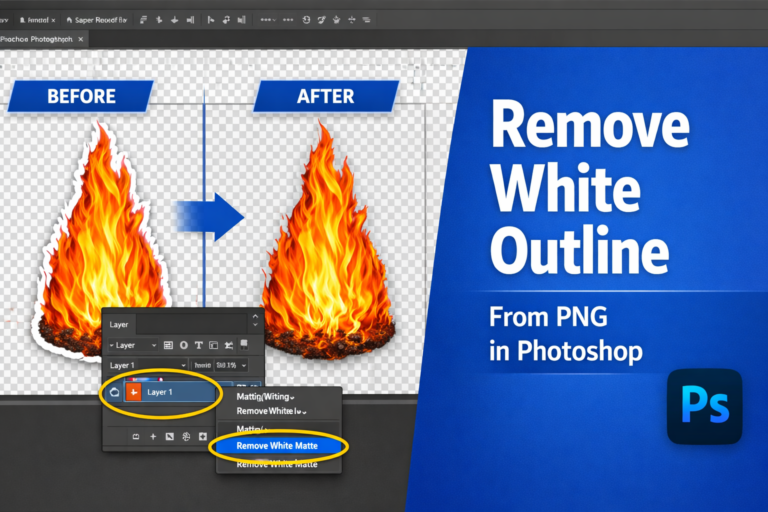
Photoshop actually has a “Delete the Halo” button hidden in the menus. It’s like a power-up for your layers.
- Click your layer (make sure it’s selected!).
- Go to the top menu: Layer > Matting > Defringe.
- A tiny box will pop up asking for “Width.” Type 1.
- Hit OK and watch that white ghosting vanish.
Pro Tip: If the white edge is still there, try it again with 2 pixels, but don’t go too far or your image will look “eaten.”
⚔️ Level 2: The “Shave & Trim” (Contract Selection)
Difficulty: Intermediate
If Level 1 didn’t work, we need to get surgical. We’re going to literally shave off the outer 1% of your image to get to the clean stuff underneath.
- The Shortcut: Hold Cmd (Mac) or Ctrl (PC) and click the tiny square picture of your layer in the Layers Panel. (This creates “marching ants” around your object).
- The Shrink: Go to Select > Modify > Contract.
- The Number: Type 1 or 2 pixels. You’ll see the “marching ants” move slightly inside the white line.
- The Mask: Click the Layer Mask button (the rectangle with a circle in it) at the bottom of your layers panel.
- BOOM. The white edge is now invisible, tucked away behind the mask.
👑 Level 3: The “Shadow Stealth” (Inner Shadow)
Difficulty: Pro Move
Sometimes you don’t want to cut the image; you just want to hide the evidence. This is the “stealth” move used by top thumbnail designers.
- Double-click the empty space next to your Layer Name to open the Layer Styles menu.
- Check the box for Inner Shadow.
- The Secret Settings:
- Blend Mode: Multiply
- Color: Black (or a dark version of your asset’s color)
- Distance: 0
- Choke: 100%
- Size: 1 or 2px
- This creates a tiny “dark rim” inside your PNG that perfectly covers the white fringe.
📦 Grab Clean Assets Here!
Tired of cleaning up bad cutouts? We do the dirty work for you. Grab our pre-cleaned, high-res “Pro” packs and skip the Photoshop headache:
- The VS / Comparison Mega-Pack: Perfect edges for battle thumbnails.
- The Curved Arrow Pack: Clean, vibrant, and halo-free.
- The Speech Bubble Starter Kit: Drop them on any background instantly.
Would you like me to create a “Cheat Sheet” graphic layout for this post that you can pin to Pinterest to get more traffic?